Monday, April 23, 2012

Crab Delights

Long time no see!  Literally...since October.  Long story short, I began working the holiday shift at Best Buy and became consumed with that.  I had absolutely no time or energy to cook anymore.  Thus began a long addiction to fast food.  But I'm working on getting back to cooking and eating better.  So!  I'm starting up my blog again, but won't be so strict about posting.


On today's menu is Crab Delights!


Other than accidentally burning the bottoms/edges of them, they turned out pretty good!  And they're SO quick to make!  I literally mixed up the crab spread in the morning and then right before Garry came home from work I spread it onto the mini-buns and stuck them in the oven for a few minutes.  Easy peasy!  Accompanying them was some clam chowder (from a can).


Ingredients
Serving size: 5 mini buns


  • 1 (6 oz) can of crab meat
  • Shredded cheddar cheese
  • 1/4 cup butter, softened
  • 2 tbsp mayonnaise
  • Garlic to taste
  • 2 tbsp freshly chopped parsley
  • 5 mini hamburger buns 


Instructions:


  1. Preheat oven to 400 F
  2. In a mixing bowl combine crab, cheese, butter, mayonnaise, garlic, and parsley
  3. Spread the mixture onto the mini hamburger buns (or English muffins)
  4. Bake for 5-10 minutes

Tuesday, October 25, 2011

Lasagna Roll Ups


After a not so wonderful attempt at making curried chick peas the other day (I decided against blogging about them...and I was lazy lol) it was refreshing to have made something so easy and yet so spectacular today!!


We've been eating fairly vegetarian lately and it's been interesting.  I miss meat and potatoes but a budget is a budget.  The chicken needs to last us for a little while longer and we only have two breasts left.


Anyway, these lasagna roll ups are fantastic!!  They don't take up much room, are super easy to make, and were extremely filling.  The best part?  We only used 6 lasagna noodles to make this as opposed to using a whole box to make the traditional lasagna...and they tasted the same!


So with my highly recommended dish comes the recipe:
Ingredients
serving size: 2

  • 6 Lasagna noodles
  • 15 oz ricotta
  • 1 cup shredded mozzarella
  •  1/4 cup Parmesan
  • 1 egg
  • 10 oz frozen spinach
  • marinara sauce
  • salt and pepper to taste 
Instructions:
1: Get a large pot of water boiling with a dash of salt. When it comes to a full boil, add the lasagna noodles and cook for about 12-15 minutes. When they are finished cooking, drain.

2: While the noodles are boiling, prepare the filling. Thaw the package of frozen spinach in the microwave and then squeeze out as much excess liquid as possible. Combine the spinach in a bowl with the ricotta, mozzarella, parmesan, egg, freshly grated pepper and about 1/4 tsp of salt. Mix until well combined.

3: When the noodles and filling are ready to go, preheat the oven to 400 degrees. Prepare a glass casserole dish by spraying with non-stick spray.

4: On a clean surface, lay out a few noodles at a time. Place a few tablespoons of filling on each noodle and spread to cover from edge to edge. Make sure to spread it all the way to the edges of the noodles.

5: Roll the noodles up and place in the prepared casserole dish. Repeat until all of your filling is gone. Pour the marinara sauce over the rolled noodles making sure to cover all surfaces. The sauce will keep the noodles hydrated and soft while baking.

6: Cover the dish in foil and bake for 30 minutes.


If you want to see this recipe in pictures, head over to budgetbytes where I originally got the recipe.


Highly recommend!!

Saturday, October 22, 2011

Chicken Divan & Fried Rice

Of course the schedule was shot to crap right off the bat but oh well, it's still good to have a plan and hopefully as we go along it'll be easier to stick to it.  I didn't have time to post yesterday so I'll do two dishes in one entry: yesterday's and today's.  And...per usual, the schedule is off but the rest of the dishes should be making an appearance at some point this week, except one.


Chicken Divan


One of my favorite meals from Ohio.  I made it once before a few years ago but never on my own...and it's actually quite simple!  It uses a lot of ingredients but most of them are standard things you'd have laying around the house.  The only thing we needed to get to make this dish was cream of mushroom soup (which we found at the dollar store--yipee!!)


Ingredients
Serving size: 2

  • 1 TBSP oil
  • 2 boneless, skinless chicken breasts
  • 2 cups broccoli
  • 1 can cream of mushroom soup
  • 1/4 cup milk
  • 1/4 cup mayonnaise 
  • 1/8 tsp curry powder
  • 2 tsp lemon juice
  • 1/4 tsp black pepper
  • 1/4 cup bread crumbs
  • 1/2 cup cheddar
Instructions

1. Salt and pepper the chicken breasts and saute until done, turning in the pan to cook evenly. Cut each breast into half or thirds.

2. Cook the broccoli in boiling water for 2-3 minutes, then drain.

3. Spray or oil a 9x9 pan, add the broccoli, then add the cooked chicken pieces on top.

4. In a small bowl, mix together the soup, milk, mayonnaise, curry powder, lemon juice, and pepper. Spread over the chicken and broccoli. Sprinkle the cheese on top, then sprinkle the bread crumbs on top of that.

5. Bake at 350 for 20 minutes.


Super yummy and works well as comfort food!  Always a favorite at home


Fried Rice


An amazing meal when you're feeling lazy and want something yummy and easy to make.  However, I can't take credit for this, Garry did most of the work.  I was going to but he had to scramble the eggs and just kinda kept going from there.  Either way, it's an easy dish and wonderful when you have left overs/items you dunno what to do with.  Like us?  We had carrots for awhile and didn't know what to do with them...throw em in the fried rice!


I don't really have measurements for this one because we really just threw stuff together.  So...basically take the following ingredients and throw them together (or whatever else you'd like to add)


Ingredients
Serving size: 2-ish

  • 1 1/2 cups rice
  • green onion
  • carrots
  • soy sauce to taste
  • scrambled eggs
  • garlic powder to taste
Walla!  We would have added peas but we didn't have peas...and like I said, you can add whatever you want.  We would have added more but we didn't have anything more to add.  And it was surprisingly filling :)  Great vegetarian dish on a budget!

Wednesday, October 19, 2011

Menu Oct 20-27

After doing some budgeting (and a surprise extremely low electricity bill yay!) we actually realized we have enough money if we're careful to feed ourselves the next two and a half weeks.


I know I didn't really stick to the menu last week but so much craziness was happening!  This week is much calmer so hopefully things will stay to the plan!  (there may be a day or two that get's thrown off because my dad is coming to visit)


Thursday Oct 20
Chicken Divan 


Friday Oct 21
Tuna Stuffed Shells


Saturday Oct 22
Lasagna Roll Ups


Sunday Oct 23
Fried Rice


Monday Oct 24
Curry Chickpeas over rice


Tuesday Oct 25
Baked Pasta


Wednesday Oct 26
Tuna Lasagna


And with my careful planning our shopping list only consists of:

  • Ricotta
  • Mozzarella D
  • Spinach Opt D
  • Celery Opt
  • 2 cans of cream of mushroom D
  • soy milk D
  • Pasta D
  • Chickpeas
  • cottage cheese 
Again, the D means things we can get at the dollar store and opt means optional.  I'm hoping to only spend $15 max today but hopefully we'll be able to come in under that goal.

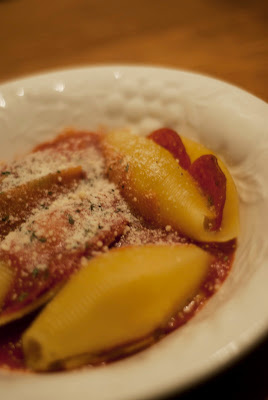
Pizza Stuffed Shells


It was an interesting day today...Garry was at work and I had no idea what to make with the few supplies we had left.  I was browsing through some ideas and came across this one...pizza stuffed shells.  Sure, why not?  Only problem was I had no recipe...this was from my own head.  So I very tentatively began to cook.


The results?  Really good actually! 


Since this was from my brain I was kinda winging it and I don't know exact measurements but I'll do my best to guesstimate.


Ingredients
Serving size: 2

  • 6 jumbo stuffed shells
  • 1/4 cup mozzarella 
  • 1/4 cup cheddar
  • 1/4 cup milk
  • 1 egg
  • 1 TBSP flour
  • 1 tsp black pepper
  • 1 tsp nutmeg
  • 12 slices of pepperoni
Instructions

1. Cook the jumbo shells as directed on the package

2. In a skillet, mix the two cheeses and the milk together, using a whisk on medium heat.  Let the mixture bubble for a minute to thicken the sauce.

3. In a separate pan crack the egg and mix together the black pepper and nutmeg.  Once the cheese mixture is thick, mix it together with the egg, black pepper, and nutmeg.

4.  Once the mixture is a sauce, add the flour and whisk together.

5. Pick up each shell and use a spoon to put the cheese sauce into the shell (2 scoops is plenty) then place two pepperoni into the shell.  

6. Place each shell on a baking pan.  Heat the oven to 350

7. Cook the shells for 10 minutes and then remove.  Serve with tomato sauce, Parmesan, and basil

Yummy!  My own creation too...I was absolutely improvising for the fact that we had no ricotta-eep!

Sunday, October 16, 2011

Mac N Cheese


It's mac and cheese day!  Who doesn't love good, homemade mac and cheese?  I'll admit though, I do love out of the box...but that gets expensive...and it doesn't taste as good as the real thing.


Ingredients
Serving size: 6

  • Butter (4 TBSP)
  • Milk (2 1/2 cups)
  • Flour (1/4 cup)
  • Salt
  • Nutmeg (1/8 tsp)
  • Black Pepper (1/8 tsp)
  • Cayenne pepper (1/8 tsp)
  • Cheddar cheese (3 cups)
  • Mozzarella cheese (2 cups)
Instructions

1. Preheat oven to 375 degrees and butter/spray a casserole dish

2. Boil pasta as directed on the package

3 In a medium saucepan set over medium heat, heat milk. In the same pot you used for boiling the pasta, melt remaining 6 tablespoons butter over medium heat. When butter bubbles, add flour. Cook, whisking, 1 minute.

4. While whisking, slowly pour in hot milk. Continue cooking, whisking constantly, until the mixture bubbles and becomes thick.

5. Remove pan from heat. Stir in salt, nutmeg, black pepper, cayenne pepper,cheddar cheese, and mozzarella cheese

6. Pour mixture into prepared dish. Sprinkle remaining cheddar cheese and breadcrumbs over top. Bake until browned on top, about 30 minutes.


Yummy mac and cheese for a comfortable night in!  And we made 6 servings so we can eat tomorrow since I won't have time to cook :-S

Saturday, October 15, 2011

"Asian Sticky Wings"


"asian sticky wings": my version?  Not sticky and not wings...but still incredibly delicious!


It was an interesting cooking day today.  I'll first post my method of making these chicken breasts (since I have a peculiarity where I hate eating chicken on bones) and then talk about what exactly happened.  They turned out great and filled the house with an amazing smell...but it didn't come without it's problems.


Also, you can click on the link to go to the original recipe whenever you want...my way is almost nothing like her's...only because I hit a snag in the cooking process.


Ingredients
Serving size: 2

  • Chicken Breast (1-2)
  • Honey (1/8 cup)
  • Soy Sauce (2 TBSP)
  • Chili Powder & Garlic (1 TBSP)
  • Oil (1 TBSP)
  • Teriyaki Sauce (2 TBSP)
  • Vinegar (1 TBSP)
  • Ginger (1 TBSP)
  • Green Onion (1 sliced)
Instructions

1. Mix the honey, soy sauce, chili powder/garlic, oil, teriyaki sauce, vinegar, and ginger together in a bowl using a whisk until they are all blended together in a sauce

2. Put the chicken and the sauce in a baking pan and cook at 450 for 20-25 minutes

3. Make another batch of sauce while the chicken cooks

4. After the chicken is cooked, put on a serving plate and pour the rest of the sauce over the chicken

5. Cut the green onion and sprinkle on top

Fair warning: you may end up with black tar crap on your baking dish.  I know I did...and that's where my problems happened.  Unfortunately our baking dish is much too big for the chicken.  To save on the chicken I only used one breast and cut it in half.  Putting that small breast into a large pan=sticky crap everywhere.

After 20 minutes in the oven I opened it up and smoke FILLED the kicthen, setting off the smoke detector (which was promptly turned off).  Thankfully the chicken was alright, but because the sauce spread all over the rest of the pan, it began to bake to a crisp.  Not good.

So in order to fix this, I took the chicken out of the pan (and quickly threw the pan in the sink and filled it with water...hopefully soaking for a few hours will make the cleaning process less awful) and created another batch of sauce to pour over the chicken.

While the sauce was runny, it made for an EXCELLENT decision.  I made my mashed potatoes and the sauce mixed with them, added flavor to the chicken, and was overall amazing to have laying all over the plate.  It would have been amazing over rice as well, for sure.

So while mine ended up nothing like the original recipe it still came out INCREDIBLE.  I'm honestly craving more now.  Though next time I think I'm going to cook the chicken in a sauce pan over the stove with the sauce and see what happens.  Hopefully it'll be more rich and thick like it was supposed to be in the first place.